Friday, October 14, 2011

Turn An Outfit Into a Room: Seriously Structured

In an attempt to earn herself the chance to design a collection to walk the runway at New York's fashion week, Kimberly took a risk with color in her design in last night's Project Runway (season 9). The judges were not a fan of the color combo, but rewarded her the chance of a lifetime based on her overall design concepts and abilities. The looks she created were seriously structured but kept youthful and playful through the use of materials and colors.

Apart from bold color, Kimberly's designs are kept interesting by structure and asymmetry. These concepts will always capture and hold the eyes of a viewer. Kimberly's mix of these, along with with color and glamorous details made for a winning design in my opinion.

This design concept can be translated into a living room setting by using structured, tailored furniture with clean lines and detailing such us button tufting and fine stitching. To keep it glam and modern use materials such as sleek leather, silk, and velvet. Items with a higher sheen are more modern. Mix these different materials in the same color tone so that you can add one good punch of color such as the tangerine that Kimberly used.


Friday, October 7, 2011

Turn An Outfit Into a Room: Soft and Feathery

Viktor's cockatoo-inspired gown may not have pulled out a win on last night's Project Runway, season 9, but it did win on my inspiration list. This gown was soft, flowing and romantic. And while it was adorned with feathers, I thought Viktor did an excellent job of strategically placing them so as not to detract from the design but to enhance it.
Restraint in design is one of the most difficult things to accomplish. Design, whether it be in fashion or interiors, should look effortless and not at all overworked. The gown above accomplished this with the organic draping of material and just the right amount of color and details to keep the design interesting.
The room below uses the same ideas to create a soft, feminine bedroom with just the right amount of visual interest. This is created with a single pop of bold color against soft neutrals. To keep the monochromatic background from becoming boring, a mix of textures rather than patterns was used so as not to fight with such a bold color accent. The resulting bedroom looks effortless and beautiful.


Friday, September 30, 2011

Turn An Outfit Into a Room: Modern Throwback

Last night on Project Runway season 9, the judges were not a fan of Laura Kathleen's 70's inspired look. And while it may not have been a hit on the runway I thought it would make a spectacular room design!

The bold graphic of the black and white top is iconic of the 70s, and personally I liked it paired with the colorful print of the skirt. I believe that these two prints can work together because one is so strong, linear, and large in scale while the other is more soft, organic, and has a tighter or smaller scale. Maybe my opinion is in the minority, but let me know what you think of this outfit turned into a room...


Friday, September 23, 2011

Turn an Outfit Into a Room: Masculine Edge

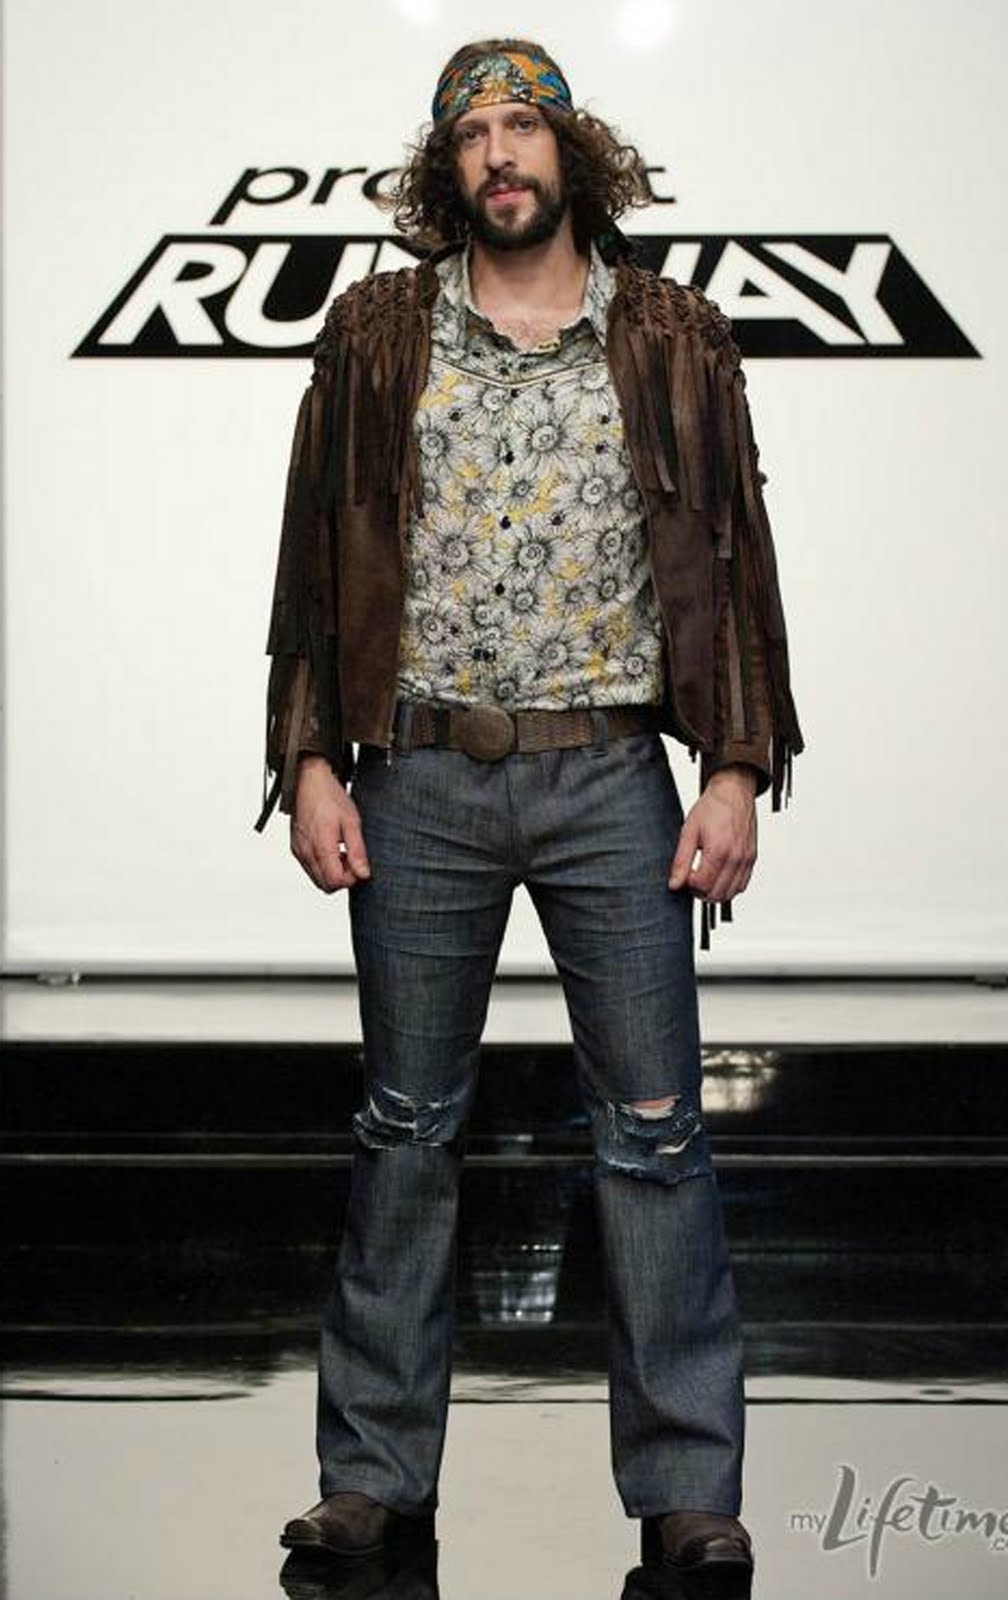
Viktor pulled out another victory last night on Project Runway (season 9)! This time the challenge was to create a new look for one of the members of an up and coming band. Viktor created a look that was masculine and a bit bohemian... normal enough for the average man but with enough edge for a rockstar!
The distressed denim and leather jacket are staples of masculine wardrobe. However the tailoring of the jeans and incredible detail in the jacket are what make these so much more than simple clothing staples. These masculine materials balance the softness found in the floral shirt. Its these extra details and juxtaposition of materials that create the edge of the design while still using comfortable and recognizable pieces.

The same juxtaposition can be applied to the design of a room. Natural, raw materials countered by tailoring and fine details create a comfortable, masculine aesthetic.

Friday, September 16, 2011

Turn an Outfit Into a Room: Youthful Sophisticate

This look by Viktor Luna was one of the top designs on last night's Project Runway (season 9), and while it did not win I thought it would make a beautiful room.
The vintage look of this outfit is modernized by the colors used.
These pops of youthful color and sheerness of the top make this outfit a bit playful, while the sophistication of the outfit is created through the selection of the materials, the length of the skirt, and the overall shape created for the woman.

This "geek chic" concept can be translated into the design of a Living Room by using these same guidelines. The use of the materials, the lines of the furniture, and strategic pops of color will create a similar aesthetic full of youthful sophistication.


Saturday, September 10, 2011

Please don't...

This is my personal plea to everyone out there... please don't karate chop your pillows.

Seriously, it does not make them look better.

Pillows by nature should be soft and comfortable, why would you want to make them look stiff and overly styled?

Please stop. Thank you.
Ellenor

Wednesday, September 7, 2011

DIY Storage Boxes: Decorative and Functional!


Here's an easy craft that puts the FUN back into functional: Decorative storage boxes! Fact: we all need storage... and we all have things that we need to keep accessible but that we don't necessarily want visible.
For me, this is receipts. In our budget conscious time, my husband and I save our receipts so that we can go through them at the end of the month to make sure we didn't go off track. Rather than keeping a messy stack of receipts or hiding them somewhere that was inconvenient (meaning that my husband's receipts would never make it there), I decided that I needed to create an easy and accessible place to put them when we come in the door.
Spending money on something to camouflage my messy reciepts seemed counter-productive, so I decided to create something from what I had at home! Follow these steps and you too can have pretty little boxes to hide your mess...

1. Find a box to use that will be large enough for whatever your need to hide. I always save old gift boxes for wrapping presents later, so I raided my gift box storage and found a great box with a gold lid. Perfect!
2. Gather your other supplies:
  • Material to cover your box (this could be paper or fabric... in my case I used fabric so these instructions will refer to this material),
  • Glue that is appropriate for your material (paper glue for paper, or fabric glue for fabric...)
  • Ruler
  • Scissors
  • Mod Podge (If you are using fabric to cover your box you'll need this craft glue because it dries clear and smooth... super for sealing things like fabric edges to keep them from fraying!)
  • Brush for applying the above
3. Measure the height of your box. Add 2" to that amount so that you'll have enough to wrap inside the top and over the bottom.
4. Measure the lengths of all 4 sides of your box and add those amounts together. Add at least 1" more to make sure you have enough to wrap around all the sides of the box.
5. Use your measurements above to measure and cut a long strip of fabric that will cover your box. Hold an edge of the fabric up to a corner of the box and wrap it all the way around the sides to make sure you cut enough. Now you're ready to go!

6. Cover one side of the box with your glue and smooth your fabric over the side. Be sure to keep it straight if you are working with a pattern!
*TIP* In my case I used tacky glue, and a little trick about tacky glue is that it is best if you apply it first and then let it sit for about a minute before adhering the other material to it. It actually does get tacky and will hold better if you do this!


7. Continue around each side until you reach the corner you started with. Now your box's sides are all covered!
... Try to line up the pattern of the fabric if you can and cut off the excess fabric, then glue down that edge.

8. Cut slits in your fabric where it sticks up at the box's corners. These slits make it easy for you to fold the fabric over the top edge of the box.
... Glue the fabric down along each of the sides on the inside of the box.

9. Turn the box over and again cut slits in the fabric at each corner so that you can fold the fabric flat along the bottom of the box.
*TIP* The folded fabric can make the bottom corners of the box bulky which can make the finished box sit cockeyed. To avoid this, you can cut the edges of the fabric at an angle to remove excess fabric and make the finished box sit evenly.


10. Brush on your Mod Podge (or another clear drying glue) along the fabric edges on the inside of the box, the fabric edges at the bottom of the box, and the fabric edge along corner of the box where your fabric met itself. This glue will seal the edges of the fabric to keep them from fraying.


Ta-da! A beautiful place to stash my receipts...

Now it's you're turn. Happy crafting!

xoxo,
Ellenor