Showing posts with label do it yourself. Show all posts

Sunday, March 18, 2012

How To Customize and Add Length to Ready-made Curtains

Ready-made curtain panels can easily be purchased at most stores. They are an inexpensive way to help complete a room’s look. However, many ready-made curtains come in standard lengths, which don’t always work in your home. Adding a fabric to any curtain panel will not only add length to the panel, but will also add your own personal touch to them. Select a contrasting or coordinating fabric, solid or patterned, to go with the curtain panels you already have and help achieve the look you want and create your own custom curtains!

Materials Needed: Store bought curtain panels, fabric of your choice, fusible fabric iron on, scissors, yardstick, iron, and curtain hardware
1. Before you get started, measure where your current curtain panels hang and then measure how much additional fabric you will need to add in order for them to just skim the floor. Typically, curtains should be mounted about halfway between the top of the window frame and the ceiling. However, with higher ceilings measure the distance above the window frame to the ceiling and then mount the curtains about 1/3 of that distance.
2. Shop for your fabric! The fabric can be added to either the top or the bottom of your existing panels. The directions given are for adding fabric to the bottom of the panels. As a rule of thumb, the darker fabric should be at the bottom to keep the curtains visually balanced.
3. Lay out your ready-made panels flat and then lay your selected fabric over these panels so that you can copy the width. Add a couple of inches at each edge so that you can fold over for a nice seam. Measure and cut the desired length as well, also leaving a few inches to fold over.
4. Place a strip of the fusible iron about an inch from the edge of the selected fabric, fold over about a half-inch of fabric, and iron the fabric together to create a hem. Do this all the way down each side of the fabric length-wise only.
5. Once the length of both sides of the fabric has been hemmed, position the panel onto the ready-made panel with about an inch of overlap. Once positioned, place your strip of iron-on between the fabrics and iron for about 10 seconds on each strip until you’ve adhered all of the fabric to the panel.
6. Once the fabric has been ironed onto the panel you should have a couple inches of fabric left over on each side. Cut off additional fabric on the ends so that about one inch remains
7. Again, lay down a strip of iron on fusible tape about an inch from the edge of the fabric, fold the edge over, and then iron to fuse fabric together. Do this on both ends and this will finalize all hemming.
8. Attach your new longer curtain panels to the curtain hardware and enjoy your custom curtains!

Saturday, January 14, 2012

Get Organized!

I recently had the pleasure of organizing the home office of a good friend. Now, when I say "pleasure" you much understand something about me... I am an organizational super fan! I was taught by the best, the organizational goddess herself... my mother. She molded me from a young age, even buying me an instructional "How to" children's book on organizing. At first I resisted... I fought it most of my life actually. It wasn't until I moved away that I realized (like most things she had taught me) that she was right.

I have come to learn that the skill of organization is a learned behavior. If not taught and practiced, it will not come. Enter my good friend...

My friend has many wonderful and outstanding qualities, organization is just not one of them. She works from home and was recently promoted, giving her many additional responsibilities and a large amount of paperwork to keep track of. With this promotion, she quickly realized that her "system" (or lack there of) would not support her increased workload. Knowing of my supreme skills (ahem, ahem) and of my crazy enjoyment of organizing, she came to me for help.

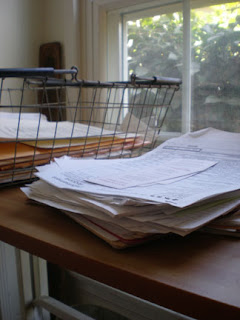
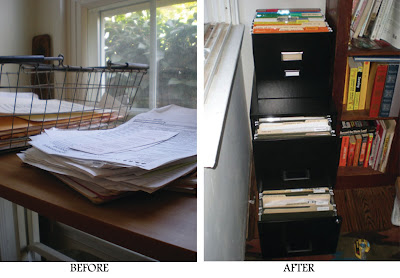
When I asked her about her current "system," I was horrified to learn about the large basket where she aimlessly threw everything. I nearly cried. I agreed to get to work immediately.

Below, you can read through how I was able to take her home office from scary to organized, and how you can do the same.

What you'll need:
A day of your time
Ample space on the floor
Lots and lots of Post-its
Pen for Labeling (I'm obsessed with Sharpies, especially the colored ones)
Paper Clips
Binder Clips (or as my friend adorably called them, "munchies")
Stapler

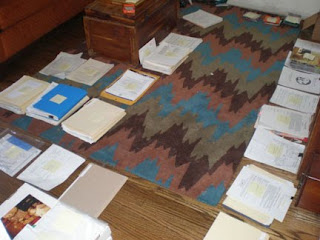
1. Grab your scary stack of unorganized papers and sit on the floor with plenty of space around you.
2. Begin by going through the scary pile each item at a time. Sort everything into different groups by making piles on the floor. To start off, be as specific as you can with these groupings... its better to have more piles than less. Once you see what you have, and how much space each group takes up, then you can decide what groupings can be combined, or further separated.
3. Stick a post-it on the top of each group/pile as you go labeling what it is.
4. Now that you are surrounded by much less frightening piles, go to your bills, invoices, etc... and put them in chronological order. Think about how you will file and how you will want to access these papers in the future... do you want the most recent date in the front or back? Choose, and then be consistent!!! Do this with all chronological groupings.
5. Take note of the papers as you go through them. Are there duplicates that you don't need? Toss them! Is the receipt separated from the invoice? Staple them together! Condense and organize!
6. Now that you have a good sense of how large or small each pile is you can begin to combine or separate as necessary. Be careful not to make any one pile too general. Otherwise this will become a catchall of random papers. For example, my husband (before he met me of course) had files of "important Papers" (which had everything from his birth certificate to an oil change printout) and "Old Receipts" (which ranged from 2001 to now... Every. Single. Receipt.)
7. Make new post-it labels for those final piles.
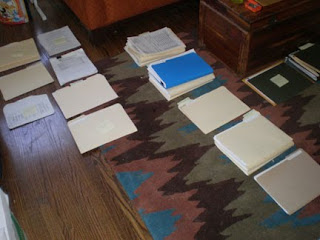
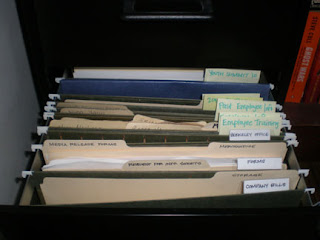
8. Survey what you have and make a shopping list of what you need to put all these piles away. Think of how you will use your new and fabulous organizational system. For storage, do you prefer 3-ring binders? File cabinet with hanging files? Letter boxes or trays? Magazine holders? Consider these storage options in conjunction with how often you will need to access the contents and their importance. Look at the amount of groups/piles you have and the space that you have to work with. Its ok to combine different storage systems. For this project, we decided to use a binder for important documents, a few boxes for media and pamphlets, a file cabinet for most, and a open file box for those most accessed papers/files. We went a step further by color coding some folders for the different phases of a project. For example, pending, researched, expired, rejected, and accepted.
9. Shop! Purchase supplies that you need to immediately organize and put away the piles on your floor as well as back up supplies for when you need to expand. I've found that if you don't have these supplies handy, chances are that you'll start scary piles again and your organizational system will fall apart!
10. Splurge! Indulge yourself with some pretty files and organizational tools for the things that will sit on your desk or that you will use most often. If you are excited about it, then you are more likely to use it!
11. Back at home, start putting away your piles. Everything is already separated so this should be pretty easy. As you are putting things away, think again about how you will use it... do you want your credit card statements very accessible, or can they go near the back?
12. Use your post-its to label the new hanging files, boxes, etc, instead of writing directly on the labels provided. Once everything is put away, this will make it easier for last minute changes.
13. Now that everything is put away and you can see your floor again, survey the space that you have created. Does it suit you? Can you keep up with it? If no, move things around and make some changes!
14. Satisfied? Good! Now, remove your post-its and start writing or printing out your labels. Have fun with these, no need to be formal with your labels! Use color, stylized writing, or phrases that you like... for example, for our color coded files mentioned above, instead of using "rejected" we wrote "not now!" to put a positive spin on it (and to remind her to check in with them later). I have a letter tray at home labeled "crap to do" where I put bills to be paid that month, forms that need to be filled out, or anything else that needs my attention when I sit down to my desk. Have fun, but be clear enough to know what you're talking about later!
15. Last but not least, my most important tip! Allow yourself a "To be filed" basket or tray that is easily accessible. This allows you to be "bad" every now and then for those times when you are in a rush of just don't feel like it. BUT leave yourself (or make yourself) go through this at least once a week to separate and file away whats in it. Otherwise, you'll have to start all over again!

Whew! The hardest part is getting started and going through that scary pile. Once you do this, I hope that you'll find it's easier to keep up with than you think. Hopefully, like myself and my friend, you'll also find that its a bit addictive! Now that she has an organized home office (with pretty files!) she went on by herself to organize her husband's desk and their shared files! I'm so proud :)

Happy organizing!
Ellenor

Wednesday, September 7, 2011

DIY Storage Boxes: Decorative and Functional!


Here's an easy craft that puts the FUN back into functional: Decorative storage boxes! Fact: we all need storage... and we all have things that we need to keep accessible but that we don't necessarily want visible.
For me, this is receipts. In our budget conscious time, my husband and I save our receipts so that we can go through them at the end of the month to make sure we didn't go off track. Rather than keeping a messy stack of receipts or hiding them somewhere that was inconvenient (meaning that my husband's receipts would never make it there), I decided that I needed to create an easy and accessible place to put them when we come in the door.
Spending money on something to camouflage my messy reciepts seemed counter-productive, so I decided to create something from what I had at home! Follow these steps and you too can have pretty little boxes to hide your mess...

1. Find a box to use that will be large enough for whatever your need to hide. I always save old gift boxes for wrapping presents later, so I raided my gift box storage and found a great box with a gold lid. Perfect!
2. Gather your other supplies:
  • Material to cover your box (this could be paper or fabric... in my case I used fabric so these instructions will refer to this material),
  • Glue that is appropriate for your material (paper glue for paper, or fabric glue for fabric...)
  • Ruler
  • Scissors
  • Mod Podge (If you are using fabric to cover your box you'll need this craft glue because it dries clear and smooth... super for sealing things like fabric edges to keep them from fraying!)
  • Brush for applying the above
3. Measure the height of your box. Add 2" to that amount so that you'll have enough to wrap inside the top and over the bottom.
4. Measure the lengths of all 4 sides of your box and add those amounts together. Add at least 1" more to make sure you have enough to wrap around all the sides of the box.
5. Use your measurements above to measure and cut a long strip of fabric that will cover your box. Hold an edge of the fabric up to a corner of the box and wrap it all the way around the sides to make sure you cut enough. Now you're ready to go!

6. Cover one side of the box with your glue and smooth your fabric over the side. Be sure to keep it straight if you are working with a pattern!
*TIP* In my case I used tacky glue, and a little trick about tacky glue is that it is best if you apply it first and then let it sit for about a minute before adhering the other material to it. It actually does get tacky and will hold better if you do this!


7. Continue around each side until you reach the corner you started with. Now your box's sides are all covered!
... Try to line up the pattern of the fabric if you can and cut off the excess fabric, then glue down that edge.

8. Cut slits in your fabric where it sticks up at the box's corners. These slits make it easy for you to fold the fabric over the top edge of the box.
... Glue the fabric down along each of the sides on the inside of the box.

9. Turn the box over and again cut slits in the fabric at each corner so that you can fold the fabric flat along the bottom of the box.
*TIP* The folded fabric can make the bottom corners of the box bulky which can make the finished box sit cockeyed. To avoid this, you can cut the edges of the fabric at an angle to remove excess fabric and make the finished box sit evenly.


10. Brush on your Mod Podge (or another clear drying glue) along the fabric edges on the inside of the box, the fabric edges at the bottom of the box, and the fabric edge along corner of the box where your fabric met itself. This glue will seal the edges of the fabric to keep them from fraying.


Ta-da! A beautiful place to stash my receipts...

Now it's you're turn. Happy crafting!

xoxo,
Ellenor

Tuesday, December 7, 2010

Furry Family Wall

Most of us are familiar with the modern “Gallery Wall” in today’s homes. It is the personal gallery that showcases one’s beloved photos, paintings, life mementos, art, and collectibles in a creative and artistic way to create a single visually striking piece of art. Gallery walls have moved out from the hallways into more prominent rooms of the home to become both a conversation piece and a personalized backdrop to our lives.

At Ellenor, we believe that today’s gallery walls should not only showcase photos of dear ol’ mom and pop, grandparents, siblings, etc. but they should also include our “furry families,” i.e. our beloved pets. Because they are as much your family as the two-legged kind!

Even more daring would be a complete Furry Family Wall! A gallery wall dedicated to those photographs of the member or members of your family with the most personality... the one wagging his or her tail at you right now. We recently met up with Kim and Sarah, founders and artists behind Bark Pet Photography. Bark Pet Photography does a brilliant job of capturing the personality and essence of our furry loved ones. These unique images are the stand out pieces that will push your gallery wall from good to fantastic! Just look at some of these incredible images!


Creating any kind of gallery wall can seem daunting, but with the right photos it can be stunning! What are the “right photos” you ask? They are the photos that make you truly happy. You should select the photos that speak to your personality. Without personality to your photos, your family wall will fall flat, so fill your wall with things you love... Your pet included! If you do this, your family wall will be something that makes you happy every time you see it.

With that being said, a few key rules do apply to gallery walls. Whether it be a Furry Family Wall or not, here are the most basic guidelines to creating a fantastic gallery wall:
• Having a good balance between staged photographs and artistic or candid photographs on your family wall is key. Mix in a few non photographed items as well (framed or not).
• All photos should be hung in close proximity to one another, 1 ½” – 2” is best.
• Mixing different frame styles is fine, but don’t select too many frames with “stand out” features (i.e. something very ornate, or colored should be kept to a minimum, otherwise the wall becomes too busy)
• Have fun with it! Lay all your photos/items on the ground in front of the wall and play around with the layout. Something will catch your eye and you'll know when it's right!

Take a look at these great gallery walls…


What makes these galleries so great? Where they all read as a single statement, each wall has those few “wow” pieces amongst the rest. You can achieve an equally stunning family wall by making one or more of your photos into a piece of art. This can be done by printing certain photos on a canvas, taking a particularly artistic photograph and printing it in a larger format, or even varying the balance of colored photographs to black and white.

Bark Pet Photography is able to make these special pieces for your wall by printing “triptych” images of your pet that are reminiscent of the old photo strips. By hanging several of these close together, a very simple Furry Family Wall can be made. If you’re feeling a bit more adventurous, hang one of these in combination with other smaller photos. See this sketch for the variations you could do using a triptych image...

There are many variables in creating a successful family wall. You need to have patience, a fun personality, a good attitude, and of course great images to pull from. If you only have one of the listed qualities, then you need to rely on the experts… Ellenor and Bark Pet Photography can help!

Friday, September 17, 2010

The Ones who Bear the Rings

No one will be more handsome than the groom on his wedding day. But in todays weddings, the ring bearers are becoming formidable competitors!

Creativity is becoming key when it comes to bearing the rings. A pillow is not your only option anymore. Just take a look at how some of these handsome boys carried the bling...

To the left: A beautiful wooden box filled with flowers made a pretty place to lay the rings in this nature inspired wedding.

Below: This clever ring bearer carried a pretty book that opens up to display the rings ( plus it will look great on your bookshelf at home while hiding other valuables!). Make it yourself!


Of course, if you prefer the pillow, there are many beautiful options out there. You can use a vintage pillow, one passed down through your family. Or buy a new one that you can pass down. For a bit more of a modern twist on the traditional, have a custom ring pillow and tie made to coordinate with your wedding!
Boys don't have to be the only option as your ring bearer... Man's best friend is also able to help out!


Plus, they make for some pretty adorable pictures!
Bride and her pup: Fresh In Love Photography.
Handsome pooch: Allyson Magda Photography


And since you may not want to put all your trust into little hands (or paws), here's a clever and downright cute way to keep the boys involved on the big day!
These adorable flags can easily be made, and they provide something fun for the boys to run around while spreading wedding day cheer!


Until next time!
xoxo, Ellenor

Sunday, August 8, 2010

The Dish on Dishtowels

One of the easiest ways to spruce up your kitchen and give it a new look is through simple accessories. My favorite kitchen accessory to rotate in and out are dishtowels, because they easy and almost always visible. They hang on your appliances, are draped on the counters and almost always live near the sink- a kitchen focal point. I usually keep two different types of towels in my kitchen at any given time. There are the towels I use to actually dry dishes and then the more decorative tea towels to look pretty and dry your hands. Here are a few of my current favorites!


I love the Anthropologie tea towels on top. The dog on the left looks a whole lot like my own pup so I actually bought a set of two the other day.

Below that are Jonathan Adler tea towels. Anything Jonathan Adler always make me happy and these towels are certain to brighten up and modernize any kitchen.

I have met a few die-hard dishtowel collectors in my life, including my own mother, and I am afraid that I may be moving in the same direction!

Best,

Ellenor

Thursday, July 8, 2010

DIY Hanging Lamps

Lighting is a key component of every project in both interior and event design. It is an obvious staple for interiors, however people often forget about the significance of creative lighting for events, big and small. We try to use distinctive lighting pieces for all our projects. This includes dinner parties, birthdays, showers, weddings etc. For example, take a look at the chandelier we used as the focal point for a brightly colored baby shower. We also just decided on 3 large, elegant chandeliers to hang in trees for an outdoor wedding at an equestrian center in May. However, it doesn't need to cost a lot of money to add a unique piece to light up a project. Below are some of our favorite "Do It Yourself" hanging lamp concepts. Get creative with materials and colors. Challenge yourself to use creative lighting at your next event or just to finish off a room. You can find the base for most of these projects (a ceiling cord) at Ikea for only $3.99.

*Our Favorite*
An Ostrich Egg Lamp
From the Ready Made magazine and website

Click here
for instructions

I have seen the eggs sold at a few different Ostrich farms in California. You can find them online as well. How cute would this look in a nursery or child's bedroom?


A Chandelier Upgrade

From craftzine.com -Instructions

I have seen people practically giving away this style of brass chandelier at garage sales.


Hanging Mason Jar Lamp
From Design Sponge- Instructions

This would look great to hang for an outdoor dinner party or just to light up a patio.


An Outdoor Planter Lamp

Also from Design Sponge- Instructions

This is incredibly cheap and clever. You could paint this a bright color and really make it pop.


We would love to hear from anyone who has made a DIY hanging lamp in the past!

Best,

Ellenor